Deno で、画像周りの取り扱いってどうなってるのか?という興味で、使えるモジュール群を調べたのでまとめ。
参考
画像にまつわるモジュール群
画像編集
ImageScript
github - matmen/ImageScript
画像の編集として次のことなどができる(かなり多機能)
- リサイズ
- 切り抜き、回転、重ね合わせ(合成)
- 色の操作
- PNG、JPEG、WEBP、GIF、SVG 書き出し
例えば、次のように利用できる。
1
2
3
4
5
6
7
8
9
10
11
12
13
14
15
16
17
18
19
20
| import { Image } from "https://deno.land/x/imagescript/mod.ts";
const image = await Image.decode(await Deno.readFile("./input.jpg"));
const default_w = image.width;
const default_h = image.height;
image.crop(
(default_w * 1) / 4,
(default_h * 1) / 4,
(default_w * 3) / 4,
(default_h * 3) / 4
);
image.rotate(90);
image.saturation(0);
await Deno.writeFile("./output.png", await image.encode());
|
インポートのタイミングで WASM を実行都度取得してくるので、実行時には–allow-net の付与が必要。 モノクロ化をするとき
image.saturation(0) と処理している。 いわゆるモノクロ化する便利関数は無いので、処理自体は自作することが多いことが見込まれる。
例えばセピア化するならこんな処理。
1
2
3
4
5
6
7
8
9
10
11
12
13
14
15
16
17
| import { Image } from "https://deno.land/x/imagescript/mod.ts";
const image = await Image.decode(await Deno.readFile("./input.jpg"));
image.saturation(0);
for (let i = 1; image.height >= i; i++) {
for (let j = 1; image.width >= j; j++) {
const [r, g, b, _] = image.getRGBAAt(j, i);
const r_s = (r * 240) / 255;
const g_s = (g * 200) / 255;
const b_s = (b * 148) / 255;
image.setPixelAt(j, i, Image.rgbaToColor(r_s, g_s, b_s, 255));
}
}
await Deno.writeFile("./output.png", await image.encode());
|
画像表示
github - mjrlowe/terminal_images
1
2
3
4
5
6
| import { printImage } from "https://deno.land/x/terminal_images@3.0.0/mod.ts";
printImage({
path: "./output.png",
width: 30,
});
|
コンソール上で画像が表示される。 コンソールの 1 文字分を 1 固まりにしたモザイク風味で画像が表示される。 1
色が、縦に長い塊になっているのを見ると、ブラウン管テレビを思い出すところがある。
画像の取得を行うツールで、プレビューにこれを採用すると、一々画像を開かなくてもざっくり内容が掴めて良さそう。
画像作成
github - martonlederer/dpng
動作はするが、github のリポジトリ自体は、アーカイブになっているためあまり推奨できない可能性がある。
1
2
3
4
5
6
7
8
9
10
11
12
| import { PNGImage } from "https://deno.land/x/dpng@0.7.5/lib/PNGImage.ts";
const png = new PNGImage(100, 100);
const gray = png.createRGBColor({ r: 100, g: 100, b: 100, a: 1 });
png.setPixel(2, 2, gray);
png.drawLine(20, 20, 2, 40, gray);
const base64String = png.getBase64();
Deno.writeFileSync("./output.png", png.getBuffer());
|
縦横の線は描けるが、斜め線は引けない。 画は描けるが、どう使えるかは考えどころ。
画像検索
github - yuzudev/ddg-images
既に、画像関連か?というものやもしれません。 DuckDuckGo
で画像検索をしたときの結果を返してくれる。
1
2
3
4
5
6
7
8
9
10
11
12
13
14
15
| import { search } from "https://deno.land/x/ddgimages@v2.0.1/mod.ts";
const results = await search("[検索キーワード]");
console.log(results.length);
results.forEach((r) => console.log(r));
|
言わずもがな 実行時は --allow-net が必要。
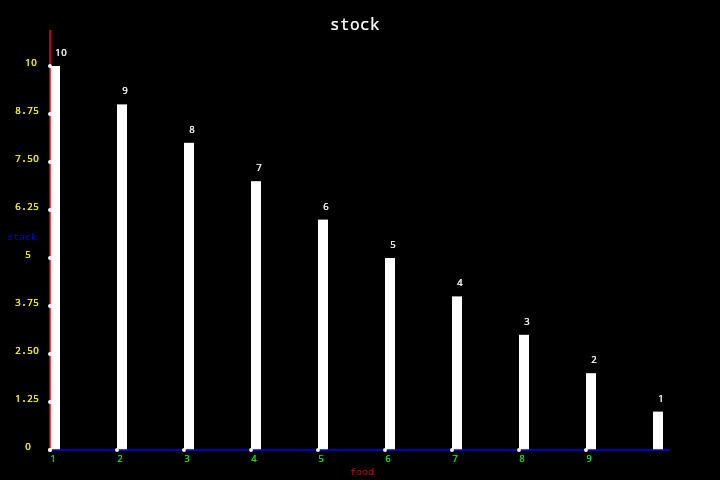
グラフ作成
github - https://github.com/Ciaxur/DenoChart
グラフを作成して、保存できる
1
2
3
4
5
6
7
8
9
10
11
12
13
14
15
16
17
18
19
20
21
22
23
24
25
26
27
28
29
30
31
32
33
34
35
36
37
38
39
40
41
42
| import Graph from "https://deno.land/x/deno_chart/mod.ts";
const graph = new Graph({
titleText: "stock",
xAxisText: "food",
yAxisText: "stack",
backgroundColor: {
r: 0,
g: 0,
b: 0,
a: 1.0,
},
yMax: 10,
bar_width: 10,
graphSegments_X: 10,
xTextColor: "rgba(255,0,0,1.0)",
xSegmentColor: "rgba(0,255,0,1.0)",
yTextColor: "rgba(0,0,255,1.0)",
ySegmentColor: "rgba(255,255,0,1.0)",
verbose: true,
});
for (let i = 0; i < 10; i++) {
const y = 10 - i;
graph.add({
val: y,
label: (i + 1).toString(),
color: "#FFFFFF",
});
}
graph.draw();
graph.save("output.png");
Deno.writeFileSync("./output2.png", graph.toBuffer());
|
作成されたグラフはこんな感じ。

.toBuffer() でデータを吐き出せるので、WEB のレスポンスとして返すことは可能の見込み。
軸のラベルに全角文字が使えるとうれしいが、まぁ望みすぎかもしれない。
2 次元コード作成 1
github - AlpacaBi/qrcode_terminal
2 次元コードを、コンソールに出力できる。
1
2
3
| import qrcode from "https://deno.land/x/qrcode_terminal/mod.js";
qrcode.generate("https://www.ccbaxy.xyz/blog/");
|
2 次元コード作成 2
github - kazuhikoarase/qrcode-generator
既に、deno 向けに公開されてるモジュールでもないが、WEB 向けに使用できそうな、2 次元コード生成を使いたかったので調べた。
1
2
3
4
5
6
7
8
9
10
11
12
13
14
15
| import qrcodeGenerator from "https://cdn.skypack.dev/qrcode-generator";
const typeNumber = 4;
const errorCorrectionLevel = "M";
const qr = qrcodeGenerator(typeNumber, errorCorrectionLevel);
qr.addData("https://www.ccbaxy.xyz/blog/");
qr.make();
console.log(qr.createImgTag());
console.log(qr.createASCII());
const svgData = qr.createSvgTag();
Deno.writeTextFile("./app11.svg", svgData);
|
サクッと取得できるのでいい感じ。
Deno で動く画像関連のモジュールをざっとまとめた。 今後の実装で使っていきたい。
ではでは。
