以前書いたストリーミングを試してみるでは、あらかじめ ffmpeg でファイルを分割し配信しました。
今回は、「生放送」の環境を用意してみます。
動くと次のようになります。
目次
参考
やること
RTMP で配信元からの通信を受け取り、hls に変換して配信する生放送サイトを構築する。
nginx + nginx-rtmp-module
nginxにnginx-rtmp-moduleを追加することで、RTMP に対応させることができるそう。
RTMP(Real Time Messaging Protocol)とは wikipedia 曰く、次の通りでした。
Real Time Messaging Protocol (RTMP) とは、Adobe が開発している、Adobe Flash プレーヤーとサーバーの間で、音声・動画・データをやりとりするストリーミングのプロトコル。
元々は Macromedia が開発していて、Adobe に買収された。プロトコルの仕様は公開されている。
だそうです。
nginx は、標準では RTMP に対応していませんが、nginx-rtmp-module を導入することで RTMP に対応させます。
nginx-rtmp-module を導入
nginx のモジュール導入は正直簡単じゃない。
配布されている nginx にちょっちょいとはいかない。
なので、しっかりメモしておく。
問題をシンプルにするため、新規に CentOS を仮想マシンを立ち上げています。
1
2
3
4
5
6
7
8
9
10
11
12
13
14
15
16
17
18
19
20
21
22
23
24
25
26
27
28
29
30
31
32
33
| # ディレクトリを用意
cd ~
mkdir nginx
cd mkdir
# ファイルの入手・ビルドに必要そうなものを導入。参考サイトより一部修正。
yum install -y wget unzip
yum groupinstall -y "Development Tools"
yum install -y pcre-devel openssl openssl-devel libxslt-devel gd-devel perl-ExtUtils-Embed epel-release
# nginx-rtmp-moduleのダウンロード
wget https://github.com/arut/nginx-rtmp-module/archive/master.zip
unzip master.zip
# nginxのダウンロード
wget http://nginx.org/download/nginx-1.17.9.tar.gz
tar zxf nginx-1.17.9.tar.gz
cd nginx-1.17.9
./configure --sbin-path=/usr/sbin/nginx \
--conf-path=/etc/nginx/nginx.conf \
--error-log-path=/var/log/nginx/error.log \
--http-log-path=/var/log/nginx/access.log \
--pid-path=/var/run/nginx.pid \
--lock-path=/var/run/nginx.lock \
--prefix=/usr/local/nginx \
--add-module=/root/nginx/nginx-rtmp-module-master
make
make install
which nginx
#=>/usr/sbin/nginx
|
nginx 設定
nginx の設定ができたので設定を修正する。
/etc/nginx/nginx.confを以下のように設定。
/etc/nginx/nginx.conf1
2
3
4
5
6
7
8
9
10
11
12
13
14
15
16
17
18
19
20
21
22
23
24
25
26
27
28
29
30
31
32
33
34
35
36
37
38
39
40
41
42
43
44
45
46
47
48
49
50
51
52
53
54
55
56
| user root;
worker_processes 1;
events {
worker_connections 1024;
}
http {
include mime.types;
default_type application/octet-stream;
log_format main '$remote_addr - $remote_user [$time_local] "$request" '
'$status $body_bytes_sent "$http_referer" '
'"$http_user_agent" "$http_x_forwarded_for"';
access_log /var/log/nginx/access.log main;
sendfile on;
keepalive_timeout 65;
gzip on;
server {
listen 80;
server_name localhost;
location / {
root /html;
index index.html index.htm;
}
}
}
# RTMP設定
rtmp {
server{
listen 1935;
access_log /var/log/nginx/rtmp_access.log;
application live{
live on;
# hls変換を有効にし、保存先を/html/liveとする
hls on;
hls_path /html/live;
# rtmpで配信しない
deny play all;
}
}
}
|
こちらに基づき、ディレクトリをいくつか作成します。nginx の welcome ページをコピーしておきます。
実際は使わないわけですが。
1
2
3
4
5
|
cp -rp ~/nginx/nginx-1.17.9/html/ /html
mkdir /html/live
|
unit ファイルの作成
nginx 公式から unit ファイルの例が示されているので、そちらをありがたく使わせていただく。
NGINX systemd service file
/lib/systemd/system/nginx.service1
2
3
4
5
6
7
8
9
10
11
12
13
14
15
| [Unit]
Description=The NGINX HTTP and reverse proxy server
After=syslog.target network.target remote-fs.target nss-lookup.target
[Service]
Type=forking
PIDFile=/run/nginx.pid
ExecStartPre=/usr/sbin/nginx -t
ExecStart=/usr/sbin/nginx
ExecReload=/usr/sbin/nginx -s reload
ExecStop=/bin/kill -s QUIT $MAINPID
PrivateTmp=true
[Install]
WantedBy=multi-user.target
|
こちらが用意できたら、systemctl start nginxで nginx を開始する。
ファイアウォール解放
1936 番ポートで RTMP が通信するので 1936 番を解放します。
また、見る側は http でのアクセスを行うので、80 番を解放します。
1
2
3
4
5
6
7
8
9
10
11
12
13
14
15
16
17
| # 1936番ポートの解放と永続化
firewall-cmd --add-port=1935/tcp
firewall-cmd --add-port=1935/tcp --permanent
# httpの解放と永続化
firewall-cmd --add-service=http
firewall-cmd --add-service=http --permanent
# 設定の反映
firewall-cmd --reload
# 設定の確認
firewall-cmd --list-services
#=>dhcpv6-client http ssh
firewall-cmd --list-ports
#=>1936/tcp
|
表示用ページの設置
/html/viewer.html を作成します。
1
2
3
4
5
6
7
8
9
10
11
12
13
14
15
16
17
18
19
20
21
22
23
24
25
26
27
28
29
30
31
32
33
34
| <html>
<head>
<meta charset="utf-8" />
<title>ストリーミング</title>
<link
href="https://unpkg.com/video.js/dist/video-js.min.css"
rel="stylesheet"
/>
<script src="https://unpkg.com/video.js/dist/video.min.js"></script>
</head>
<body>
<video
id="test"
class="video-js"
controls
width="640"
height="360"
preload="auto"
poster="poster.png"
>
<source src="live/video001.m3u8" type="application/x-mpegURL" />
</video>
<script type="text/javascript">
var player = videojs("test", {
html5: {
hls: {
withCredentials: true,
},
},
});
player.play();
</script>
</body>
</html>
|
video001の部分は任意でいいです。次の OBS の設定と共用します。
配信元設定
今回はOBSを使用します。
インストールを済ませたら、配信設定を行います。
ファイル(F)->設定(S)
配信を開き以下の設定をします。
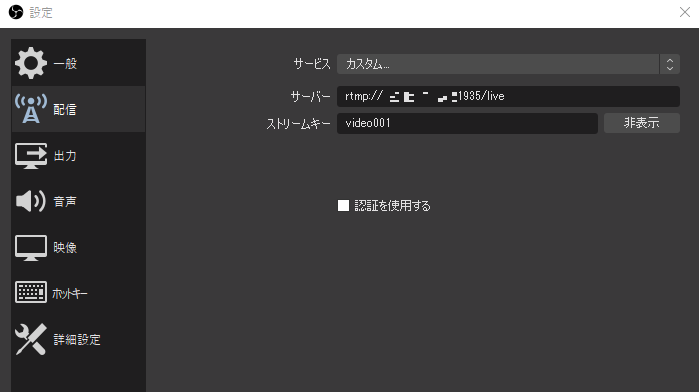
| 項目 |
内容 |
| サービス |
カスタム |
| サーバー |
rtmp://[任意のサーバーアドレス]:1935/live |
| ストリームキー |
任意の文字列(今回は video001) |
確認
http://[任意のサーバーアドレス]/viewer.html にアクセスします。
OBS にて配信を開始します。
すると以下のようなに表示されます。
左下のブラウザで youtube を開き、右側の OBS でキャプチャし、左上のブラウザに配信しています。
結構な遅延がありますが、バッファした内容を.tsに変換してゆくわけですし、まあ許容範囲かな。
サーバーの/html/liveを確認すると、以下のように.tsファイルと.m3u8ファイルが作成されています。
1
2
3
4
5
6
7
8
9
10
| ls -l /html/live/
-rw-r--r-- 1 root root 1398720 5月 5 10:04 video001-48.ts
-rw-r--r-- 1 root root 1419776 5月 5 10:04 video001-49.ts
-rw-r--r-- 1 root root 1384056 5月 5 10:04 video001-50.ts
-rw-r--r-- 1 root root 1401164 5月 5 10:04 video001-51.ts
-rw-r--r-- 1 root root 1403044 5月 5 10:05 video001-52.ts
-rw-r--r-- 1 root root 1407180 5月 5 10:05 video001-53.ts
-rw-r--r-- 1 root root 1411316 5月 5 10:05 video001-54.ts
-rw-r--r-- 1 root root 659128 5月 5 10:05 video001-55.ts
-rw-r--r-- 1 root root 254 5月 5 10:05 video001.m3u8
|
今回は、nginx に nginx-rtmp-module を導入して RTMP に対応させ、生配信を実現できました。
今の段階では、サービスになるような生配信はできませんが、実践できたのは良かったです。
できるには、できましたが制限なくアップロードできてしまいます。
次回は、ストリームキーと ID、パスワードで認証してみたいと思います。
ではでは。