先日、ドットインストールで公開されているBackbone.js 入門をやりました。
最終更新が 2013 年 3 月 12 日となっています。
一通りやりこなせましたが、時に現代は 2020 年、1 つのファイルにすべて書いてゆくのは今っぽくない(のかな?)。
今回は webpack を使ってモジュールで分割し、Backbone.js 入門に取り組んでみます。
目次
参考
作るもの
Backbone.js 入門にて作成する ToDo アプリと見た目が同じものを作成します。
環境構築
Webpack の実行環境を準備します。
以下の通り操作します。
1
2
3
4
5
6
7
8
9
|
npm init -y
npm install --save-dev webpack webpack-cli webpack-dev-server
mkdir src
mkdir dist
|
以下のようにwebpack.config.jsを作成。
1
2
3
4
5
6
7
8
9
10
11
12
13
14
15
16
17
| module.exports = {
mode: "development",
entry: `./src/index.js`,
output: {
path: `${__dirname}/dist`,
filename: "app.js",
},
devServer: {
contentBase: "dist",
open: true,
},
};
|
以下のようにdest/index.htmlを作成。
dest/index.html1
2
3
4
5
6
7
8
9
10
| <!DOCTYPE html>
<html>
<head>
<title>webpack-Backbone</title>
</head>
<body>
<h1>webpack-Backbone</h1>
<script src="app.js"></script>
</body>
</html>
|
以下のようにsrc/index.jsを作成。
src/index.js
それぞれ作成できたら、以下の通り実行して確認します。
1
2
3
4
5
6
| npx webpack
npx webpack-dev-server
|
http://localhost:8080/にアクセスするとalert("Test!");が実行された後 index.html の内容が表示されます。
src/index.jsの内容を書き換えると、ブラウザのリロードが行われます。
以上が確認できていれば OK です。
任意に、以下をpackage.jsonに記述しておくと実行コマンドが短くなって楽です。
1
2
3
4
5
| "scripts": {
"test": "echo \"Error: no test specified\" && exit 1",
"build": "webpack", <=この2行
"serve": "webpack-dev-server" <=
},
|
記述しておくと、npx webpackをnpm run build、npx webpack-dev-serverをnpm run serveで実行できます。
Backbone と必要パッケージのインストール
Backbone.jsと必要になるjQueryとUnderscore.jsをインストールします。
以下の通り実行します。
1
| npm install --save backbone jquery underscore
|
実装
実装に入ります。
Backbone.js 入門では、以下を作成します。
- モデル
- コレクション
- ビュー
- TaskView
- TasksView
- AddTaskView
- エントリーポイントの js ファイル
- js を読み込む HTML
それぞれを分割して作成します。
モデル
src/model/task.jsを以下の通り作成します。
src/model/task.js1
2
3
4
5
6
7
8
9
10
11
12
13
14
15
16
17
18
19
20
21
22
| const _ = require("underscore");
const $ = require("jquery");
const Backbone = require("backbone");
const Task = Backbone.Model.extend({
defaults: {
title: "task",
completed: false,
},
validate: function (attrs) {
if (_.isEmpty(attrs.title)) {
return "error title is empty";
}
},
initialize: function () {
this.on("invalid", function (model, error) {
$("#err").html(error);
});
},
});
module.exports = Task;
|
コレクション
src/collection/tasks.jsを以下の通り作成します。
src/collection/tasks.js1
2
3
4
5
6
| const Backbone = require("backbone");
const Task = require("../model/task");
const Tasks = Backbone.Collection.extend({ model: Task });
module.exports = Tasks;
|
ビュー
TaskView
src/view/task_view.jsを以下の通り作成します。
src/view/task_view.js1
2
3
4
5
6
7
8
9
10
11
12
13
14
15
16
17
18
19
20
21
22
23
24
25
26
27
28
29
30
31
32
33
34
35
36
| const _ = require("underscore");
const $ = require("jquery");
const Backbone = require("backbone");
const TaskView = Backbone.View.extend({
tagName: "li",
initialize: function () {
this.model.on("destroy", this.remove, this);
this.model.on("change", this.render, this);
},
events: {
"click .delete": "destroy",
"click .toggle": "toggle",
},
destroy: function () {
if (confirm("delete OK?")) {
this.model.destroy();
}
},
remove: function () {
this.$el.remove();
},
toggle: function () {
this.model.set("completed", !this.model.get("completed"));
},
template: _.template($("#task-template").html()),
render: function () {
var template = this.template(this.model.toJSON());
this.$el.html(template);
return this;
},
});
module.exports = TaskView;
|
TasksView
src/view/tasks_view.jsを以下の通り作成します。
src/view/tasks_view.js1
2
3
4
5
6
7
8
9
10
11
12
13
14
15
16
17
18
19
20
21
22
23
24
25
26
27
28
29
30
31
32
33
34
35
36
37
| const _ = require("underscore");
const $ = require("jquery");
const Backbone = require("backbone");
const TaskView = require("../view/task_view");
const TasksView = Backbone.View.extend({
tagName: "ul",
initialize: function () {
this.collection.on("add", this.addNew, this);
this.collection.on("change", this.updateCount, this);
this.collection.on("destroy", this.updateCount, this);
},
addNew: function (task) {
var taskView = new TaskView({ model: task });
this.$el.append(taskView.render().el);
this.updateCount();
},
updateCount: function () {
var uncompleteedTask = this.collection.filter(function (task) {
return !task.get("completed");
});
$("#count").html(uncompleteedTask.length);
},
render: function () {
this.$el.empty();
this.collection.each(function (task) {
var taskView = new TaskView({ model: task });
this.$el.append(taskView.render().el);
}, this);
this.updateCount();
return this;
},
});
module.exports = TasksView;
|
AddTaskView
src/view/add_task_view.jsを以下の通り作成します。
src/view/add_task_view.js1
2
3
4
5
6
7
8
9
10
11
12
13
14
15
16
17
18
19
20
21
22
23
| const _ = require("underscore");
const $ = require("jquery");
const Backbone = require("backbone");
const Task = require("../model/task");
const AddTaskView = Backbone.View.extend({
el: "#addtask",
events: {
submit: "submit",
},
submit: function (e) {
e.preventDefault();
var task = new Task();
if (task.set({ title: $("#title").val() }, { validate: true })) {
this.collection.add(task);
$("#title").val("");
$("#err").html("");
}
},
});
module.exports = AddTaskView;
|
エントリーポイントの js ファイル
src/index.jsを以下の通り作成します。
src/index.js1
2
3
4
5
6
7
8
9
10
11
12
13
14
15
16
17
18
19
20
21
22
23
24
25
| const $ = require("jquery");
const Tasks = require("./collection/tasks");
const TasksView = require("./view/tasks_view");
const AddTaskView = require("./view/add_task_view");
const tasks = new Tasks([
{
title: "taskA",
completed: true,
},
{
title: "taskB",
},
{
title: "taskC",
},
{
title: "taskD",
},
]);
const tasksView = new TasksView({ collection: tasks });
const addtaskView = new AddTaskView({ collection: tasks });
$("#tasks").html(tasksView.render().el);
|
js を読み込む HTML
dist/index.htmlを以下の通り作成します。
dist/index.html1
2
3
4
5
6
7
8
9
10
11
12
13
14
15
16
17
18
19
20
21
22
23
24
25
26
27
28
29
30
31
32
| <!DOCTYPE html>
<html>
<head>
<title>webpack-Backbone</title>
<style>
.completed {
text-decoration: line-through;
color: cadetblue;
}
</style>
</head>
<body>
<h1>Tasks</h1>
<form id="addtask">
<input type="text" id="title" />
<button type="submit">Add</button>
<span id="err"></span>
</form>
<div id="tasks"></div>
<div>
<p>残り<span id="count"></span></p>
</div>
<script type="text/template" id="task-template">
<input type="checkbox" class="toggle" <%= completed ? 'checked':'' %> >
<span class="<%= completed ? 'completed' : '' %>">
<%= title %>
</span>
<span class="delete">[X]</span>
</script>
<script src="app.js"></script>
</body>
</html>
|
確認
実装パートで各ファイルを作成し、npm run serveを実行します。
以下のように表示されるはずです。
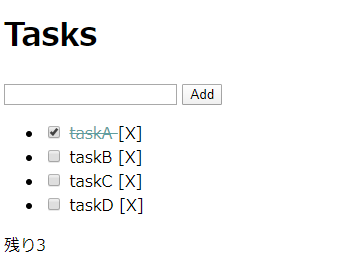
リストへの追加、ステータス変更ができます。
WebpackでBackbone.jsとjQuery、underscore.jsをバンドルした app.js でBackbone.jsのアプリを動かせました。
今回は、Backbone.jsをWebpackを用いてBackbone.js 入門を参考にアプリを実装しました。
しばらくBackbone.jsの実装を試したいと考えています。
Backbone.js 入門ではBackbone.Routerが取り扱われていないです。
これらを学んでみて、何かを作成するところまでは進めてみる予定です。
ではでは。